
No-Bake Oreo Dessert Cups (Easy, Creamy & Layered)
Some desserts don’t need an oven or a long ingredient list to feel special. No-bake Oreo dessert cups are a good example of that. They’re simple, creamy, and layered in a way that instantly makes them look more impressive than the effort they take.
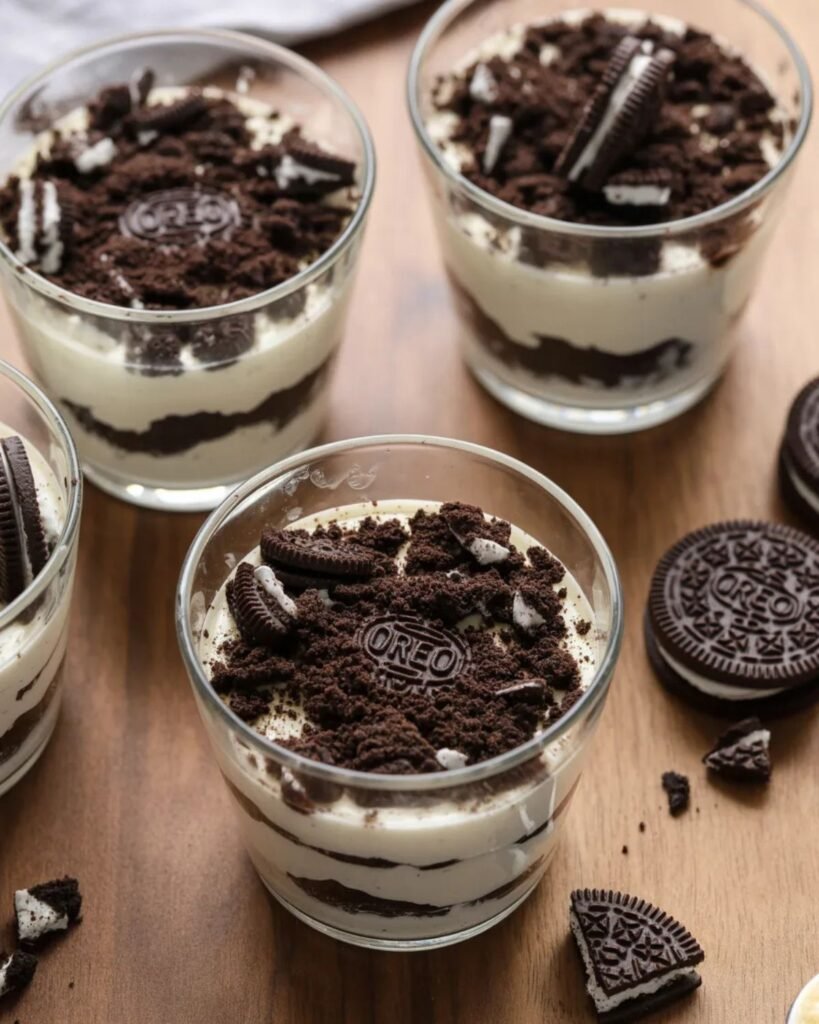
There’s also something especially satisfying about desserts served in cups. They feel neat, portioned, and easy to make ahead. With crushed Oreos, a smooth cream filling, and soft cookie layers throughout, these cups deliver that familiar cookies-and-cream flavor in a dessert that works for parties, family dinners, or late-night sweet cravings.
What makes this recipe so useful is how low-stress it is. You don’t need to bake anything, worry about slicing a cake neatly, or wait for complicated layers to set. You just mix, layer, chill, and serve.
Quick Overview
Prep Time: 20 minutes
Chill Time: 1–2 hours
Total Time: About 1 hour 20 minutes
Servings: 6 dessert cups
Perfect for:
• no-bake desserts
• party sweets
• easy layered desserts
• cookies and cream lovers
• make-ahead treats
Because these Oreo dessert cups chill in the fridge instead of baking in the oven, they’re especially useful when you want a dessert that feels homemade without much effort.
Why These No-Bake Oreo Dessert Cups Work
A good no-bake dessert needs strong texture as much as strong flavor. If everything is too soft, the cups feel flat. If the layers are too heavy, the dessert stops feeling light and enjoyable.
These no-bake Oreo dessert cups work because each layer brings something different.
The crushed Oreo base gives the dessert structure and a rich chocolate cookie flavor. The creamy filling lightens the texture and balances the cookies with a smooth, slightly fluffy layer. Extra crushed Oreos folded in or sprinkled between layers make the dessert feel more complete, so every spoonful actually tastes like cookies and cream instead of just sweet cream.
Another reason they work so well is presentation. Layered desserts naturally look appealing in clear glasses, and that matters on both Pinterest and your blog. Readers can instantly see what they’re getting.
The flavor is also familiar in the best way. Oreos are one of those ingredients people already trust, so recipes built around them tend to feel easy, nostalgic, and crowd-friendly.
Ingredients
You only need a handful of simple ingredients to make these easy Oreo dessert cups.
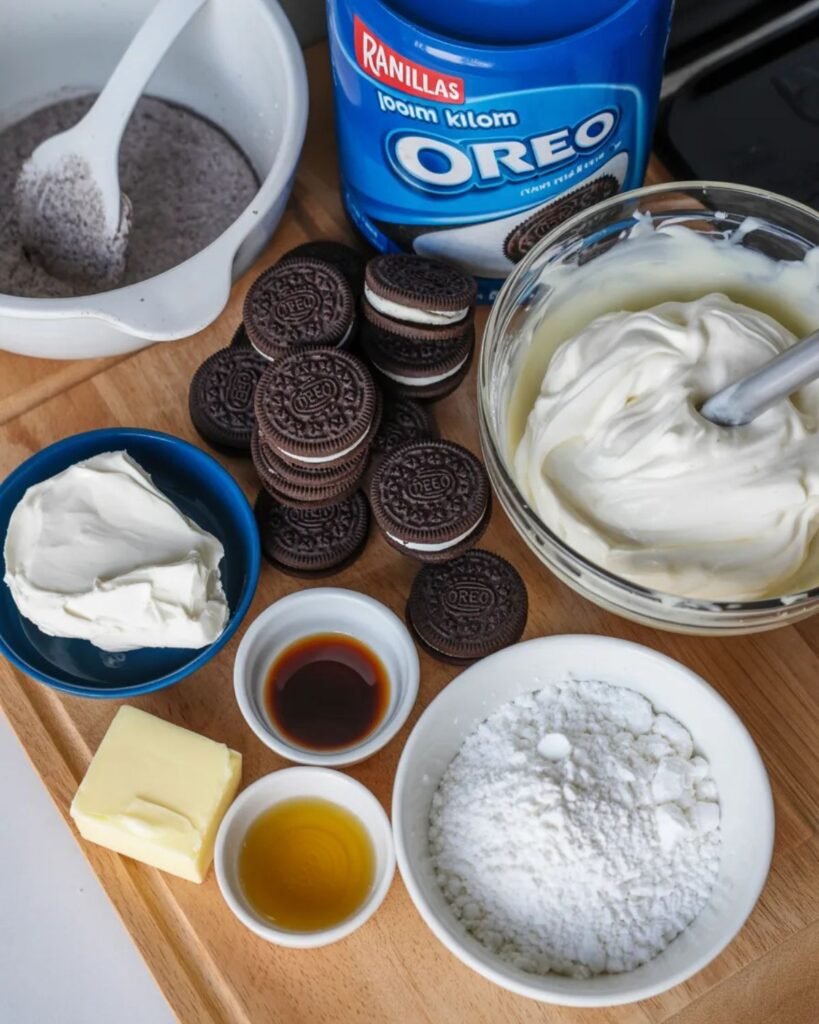
Oreo Layer
24 Oreo cookies, crushed
4 tablespoons melted butter
Creamy Filling
8 ounces cream cheese, softened
1 cup heavy whipping cream
1/2 cup powdered sugar
1 teaspoon vanilla extract
Extra Layers and Topping
6–8 more Oreo cookies, crushed
Extra whipped cream (optional)
Mini Oreo pieces or crumbs for garnish
This combination gives you the classic cookies-and-cream flavor with enough creaminess to keep the dessert soft and easy to spoon.
Choosing the Best Oreos
Oreos are the main flavor in this recipe, so a few small choices matter.
Classic Oreos Work Best
Regular Oreo cookies are the most reliable option because they create the classic cookies-and-cream flavor and texture people expect.
Double-Stuf Oreos Can Make It Sweeter
You can use them, but they add extra filling and sweetness. For a more balanced dessert, classic Oreos are usually the better choice.
Golden Oreos Change the Flavor Completely
They can work if you want a vanilla-style dessert cup, but this specific recipe is best with standard chocolate sandwich cookies.
For the cleanest cookie flavor, stick with classic Oreos first. Once you’ve made the recipe once, it’s easier to experiment.
Why Cream Cheese Makes the Filling Better
Some no-bake dessert cups use whipped topping alone, but cream cheese gives the filling more body and better flavor.
It Adds Structure
Cream cheese helps the filling stay stable after chilling, which makes the layers look cleaner in the glass.
It Balances Sweetness
Oreos are already sweet, so a slightly tangy cream cheese filling keeps the dessert from becoming too sugary.
It Creates a More Cheesecake-Like Texture
That’s part of why these cups feel richer and more satisfying than a basic whipped dessert.
It’s a small ingredient change, but it makes the recipe taste much more complete.
Step-by-Step: How to Make No-Bake Oreo Dessert Cups
Step 1: Crush the Oreo Cookies
Crush the Oreo cookies into fine crumbs.
You can do this in a food processor or by placing them in a sealed bag and crushing them with a rolling pin.
For the base layer, finer crumbs work better because they press down more neatly. For extra layers or topping, a few larger crumbs are fine and actually add nice texture.
Step 2: Make the Oreo Base
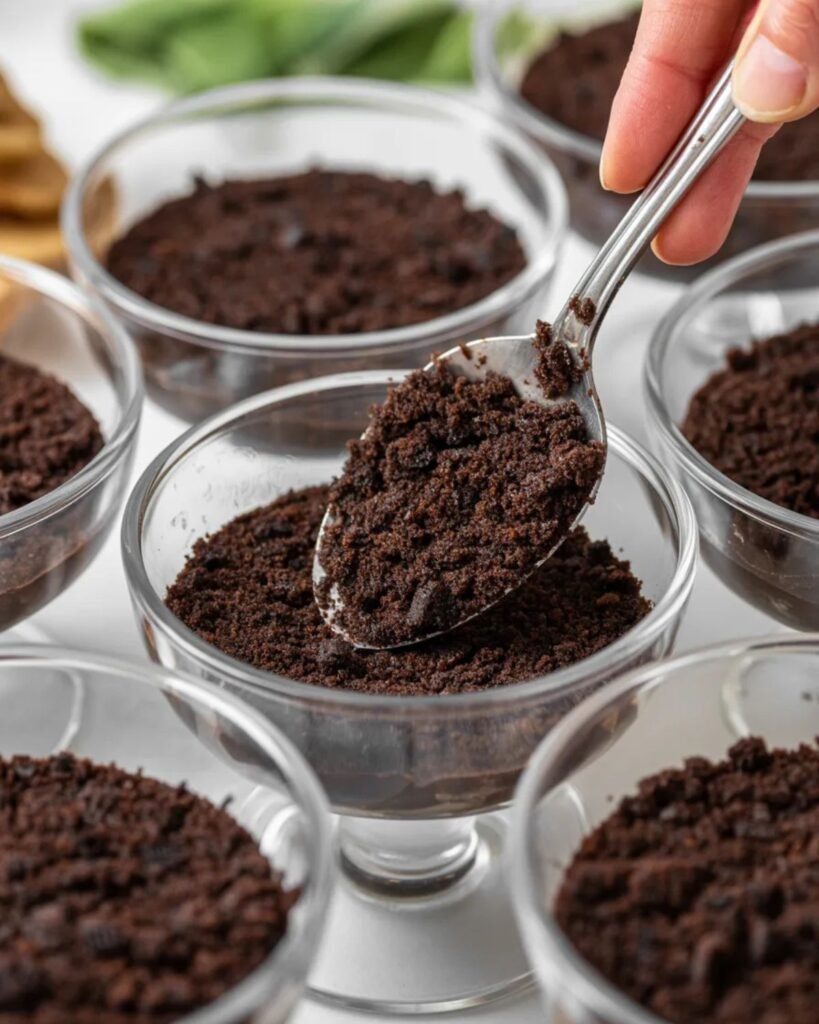
In a bowl, combine the crushed Oreos for the base with melted butter.
Mix until the crumbs are evenly moistened.
Spoon some of the mixture into the bottom of each dessert cup or glass. Press lightly with the back of a spoon to create a small crust layer.
It doesn’t need to be packed tightly like a full cheesecake crust, but it should be firm enough to hold together.
Step 3: Beat the Cream Cheese
In a medium bowl, beat the softened cream cheese until smooth.
This is one of the most important texture steps in the whole recipe. If the cream cheese starts out lumpy, the filling usually stays that way.
Once smooth, add the powdered sugar and vanilla extract. Beat again until fully combined.
Step 4: Whip the Cream
In a separate bowl, whip the heavy cream until soft to medium peaks form.
The cream should hold shape but still look smooth. If you overwhip it, the texture can become grainy instead of soft and fluffy.
Step 5: Fold the Filling Together
Gently fold the whipped cream into the cream cheese mixture.
Take your time here. Fold rather than stir hard so the mixture stays light.
At this point, the filling should look creamy, airy, and spoonable.
Step 6: Add Oreo Crumbs to the Filling
Fold in some extra crushed Oreo crumbs.
This step makes the filling feel more like cookies and cream instead of just plain cheesecake filling with cookies on top.
The crumbs should be evenly distributed, but don’t overmix.
Step 7: Layer the Dessert Cups
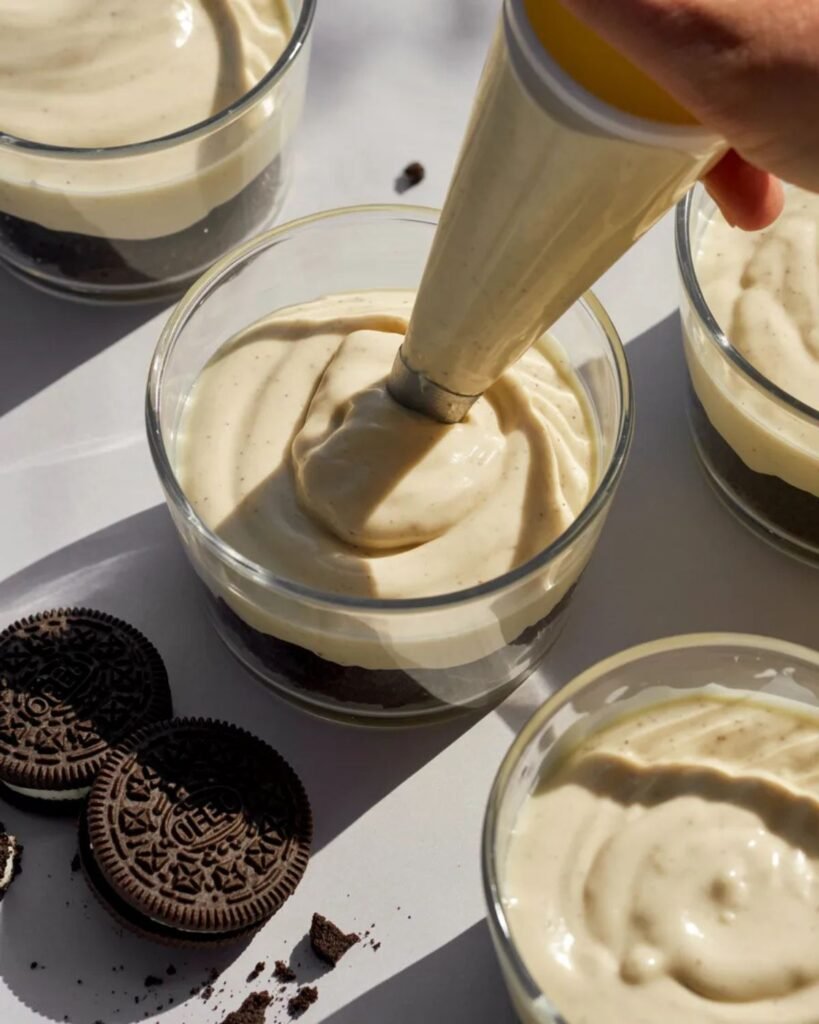
Spoon or pipe a layer of cream filling over the Oreo base in each cup.
Then add a small sprinkle of extra Oreo crumbs.
Repeat with another layer of filling if your cups are tall enough.
Top with whipped cream, extra cookie crumbs, or mini Oreo pieces if desired.
Step 8: Chill Before Serving
Place the dessert cups in the refrigerator for at least 1–2 hours.
This helps the filling firm up and gives the layers time to settle.
If you have time, a slightly longer chill often makes the texture even better.
Tips for the Creamiest Oreo Dessert Cups
Small details make a big difference in no-bake layered desserts.
Use Softened Cream Cheese
This is one of the most important steps. Softened cream cheese blends smoothly and prevents lumps in the filling.
Whip the Cream Separately
Whipping the cream on its own before folding it in creates a lighter texture than just mixing everything together at once.
Don’t Overmix After Adding Oreo Crumbs
A little folding is enough. Overmixing can flatten the filling and make it heavier.
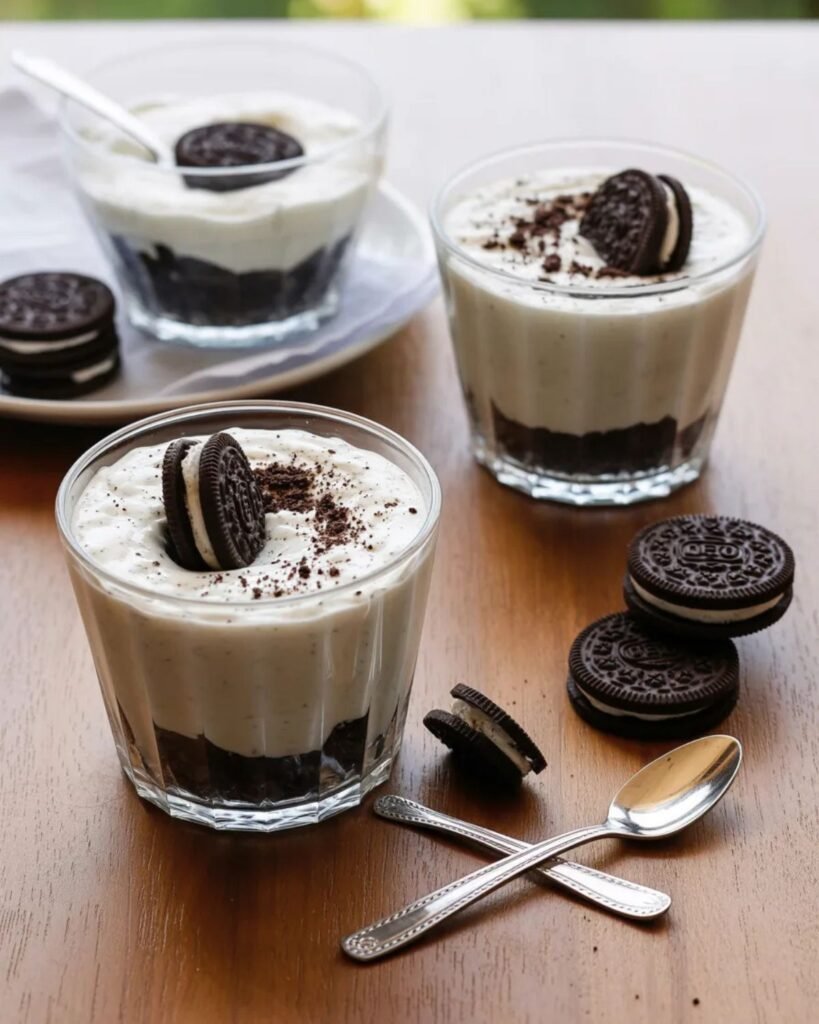
Use Clear Dessert Cups
This isn’t about flavor, but it really helps the finished dessert look more appealing. Layers are part of the charm here.
Chill Long Enough
No-bake recipes often improve with patience. Even if the dessert looks ready, the texture is usually better after proper chilling.
These steps keep the dessert soft and creamy instead of dense or messy.
Common Mistakes to Avoid
Even simple desserts can run into problems if a few small steps get rushed.
Using Cold Cream Cheese
This usually causes lumps, and once they’re in the filling, they’re hard to fix.
Making the Base Too Wet
Too much butter can turn the Oreo layer greasy instead of crumbly. The crumbs should look moistened, not soaked.
Overwhipping the Cream
If the whipped cream becomes too stiff, the final filling can feel heavier and less smooth.
Adding Too Much Oreo Crumb to the Filling
Too many crumbs can make the cream layer dense instead of soft and fluffy.
Skipping Chill Time
This is one of the most common no-bake dessert mistakes. The cups may taste fine right away, but the texture and structure are much better after chilling.
The first time a no-bake dessert turns out slightly too soft, most people think something went wrong with the recipe. Usually it’s just a matter of giving it more time to set.
Flavor Variations
Once you’ve made the classic version, it’s easy to change the dessert slightly.
Peanut Butter Oreo Cups
Add a little peanut butter to the cream filling for a cookies-and-cream peanut butter version.
Chocolate Oreo Dessert Cups
Add a spoonful of cocoa powder or chocolate pudding layer for a richer chocolate flavor.
Mint Oreo Cups
Use mint-flavored sandwich cookies or add a tiny bit of mint extract for a cool variation.
Strawberry Oreo Cups
Layer in a little chopped fresh strawberry or strawberry sauce for a fruity contrast.
Holiday Oreo Cups
Top with festive sprinkles, mini cookies, or crushed candy pieces depending on the season.
These variations keep the recipe useful year-round.
Best Cups or Glasses to Use
The cup you choose affects both the look and the serving size.
Clear Dessert Glasses
These are the best option if you want the layers to show clearly.
Small Mason Jars
Good for casual gatherings or desserts you want to store easily.
Plastic Dessert Cups
Useful for parties, especially if you’re serving a crowd and want easy cleanup.
Small Tumblers
These work well if you want a more polished table look.
In general, smaller to medium clear glasses look best for this type of dessert.
Serving Ideas
These Oreo dessert cups are rich, so they work best as a simple standalone dessert or part of a dessert spread.
Serve them:
• after dinner
• at birthday parties
• on holiday dessert tables
• at baby showers
• for weekend family treats
• with coffee or milk
They also fit nicely alongside lighter desserts or fruit if you’re building a mixed dessert tray.
Because they’re portioned individually, they’re especially practical for guests.
Make-Ahead and Party Tips
This recipe is perfect for preparing in advance.
Make Them the Night Before
The cups hold up well in the refrigerator overnight, which makes them ideal for parties or family gatherings.
Garnish Later
If you want the whipped cream or cookie topping to look freshest, add it shortly before serving.
Keep Serving Sizes Moderate
These cups are rich, so medium-sized portions usually feel more satisfying than oversized ones.
That’s one reason dessert cups work so well. They naturally make rich desserts easier to serve well.
Storage Tips
Refrigerator
Store covered in the refrigerator for up to 3 days.
Freezer
You can freeze them, but the texture is best from the fridge. Freezing may change the cream layer slightly after thawing.
Best Freshness Tip
If possible, store the cups without the final topping and garnish them closer to serving time.
That helps them look cleaner and keeps crumbs from softening too much.
Nutrition Information (Approximate)
Per serving, depending on cup size:
Calories: 330–410 kcal
Carbohydrates: 28–36 g
Fat: 22–28 g
Protein: 4–6 g
These are definitely more of a dessert than a snack, but because they’re portioned into cups, they’re easier to serve and enjoy without overcomplicating things.
Frequently Asked Questions
Can I make no-bake Oreo dessert cups without cream cheese?
You can, but the texture will be different. Cream cheese gives the filling better structure and a more balanced flavor.
Can I use whipped topping instead of heavy cream?
Yes, though the flavor and texture will be slightly sweeter and less rich.
How long do Oreo dessert cups need to chill?
At least 1–2 hours. Longer chilling usually gives a better texture.
Can I make these in one big dish instead of cups?
Yes, but the cups look better, serve more easily, and fit Pinterest-style presentation much better.
Can I use mini dessert cups for parties?
Absolutely. That’s actually a great idea for dessert tables and gatherings.
Are Oreo dessert cups good for make-ahead desserts?
Yes. They’re one of the best no-bake desserts to make ahead because the texture improves after chilling.
Final Thoughts
No-bake Oreo dessert cups are one of those recipes that feel easy in the best possible way. They don’t ask for much, but they still look like a dessert people get excited about.
The layers do most of the work. The Oreo base brings crunch and rich cookie flavor, the filling keeps everything soft and creamy, and the extra crumbs tie the whole dessert together so it really tastes like cookies and cream from top to bottom.
Some desserts impress with effort. These impress because they’re simple, dependable, and genuinely good. And sometimes, those are the recipes people actually come back to most.